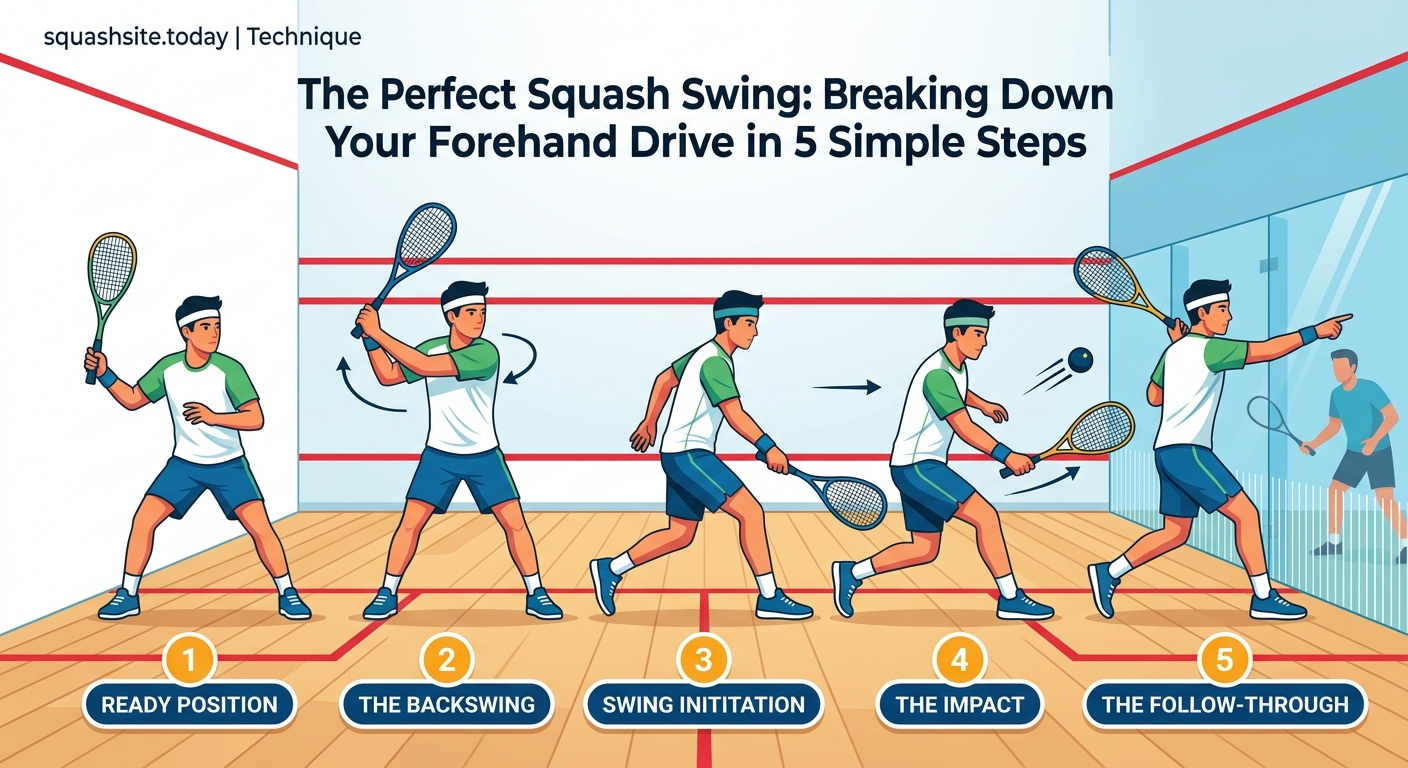
The Perfect Squash Swing: Breaking Down Your Forehand Drive in 5 Simple Steps

Your forehand drive should feel effortless. When you watch professionals glide across the court and crack the ball down the wall with precision, it looks natural. But most club players struggle with inconsistent strikes, weak shots that sit up mid-court, and a nagging feeling that something isn’t quite right. The good news? The squash forehand drive technique breaks down into five manageable steps that anyone can master with focused practice.
The forehand drive forms the foundation of attacking squash. Master the five core elements: grip position, stance and preparation, backswing mechanics, contact point timing, and complete follow-through. Each component builds on the last, creating a fluid motion that generates power whilst maintaining accuracy. Practice these steps individually before combining them into one smooth stroke that keeps opponents pinned behind you.
Understanding Why Technique Matters More Than Power
Many players think hitting harder solves everything. They swing wildly, hoping brute force will win rallies.
It doesn’t work that way.
Poor technique creates inconsistency. You might crush one drive perfectly, then tin the next three. Your arm tires after two games. Opponents read your shots easily because your preparation telegraphs everything.
Proper squash forehand drive technique does three things simultaneously. First, it maximises racket head speed through efficient body mechanics rather than muscular effort. Second, it creates a repeatable motion your body can execute under pressure. Third, it disguises your intentions until the last possible moment.
Think of it like learning to drive a car. Initially, every action requires conscious thought. But once the technique embeds itself in muscle memory, you execute complex sequences without thinking. Your forehand becomes automatic, freeing your mind to focus on tactics and court positioning.
Step One: Getting Your Grip Right
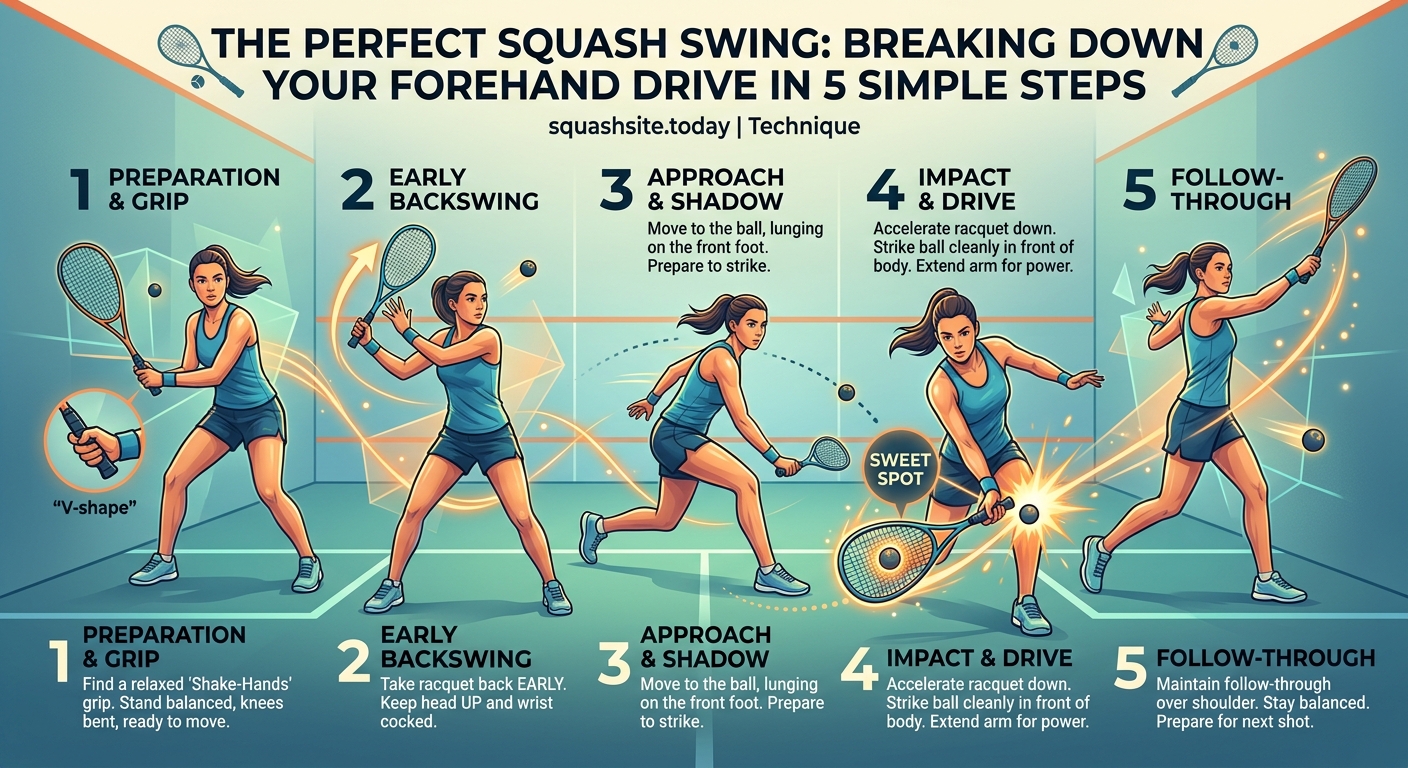
The continental grip gives you the most versatility for forehand drives. Hold your racket as if you’re shaking hands with it. The V-shape formed by your thumb and index finger should align with the top left bevel of the handle (if you’re right-handed).
This grip allows your wrist to hinge naturally through the shot. Too far towards an eastern grip, and you lose the ability to generate slice. Too far the other way, and you’ll struggle with control on high balls.
Check your grip pressure. Many players strangle their racket, creating tension that travels up the forearm. Hold firmly enough to control the racket, but relaxed enough that someone could twist it from your hand with moderate effort. Tighten at impact, then release again.
Your fingers should spread slightly along the handle. The index finger extends a bit further than the others, acting as a guide. This small detail dramatically improves feel and touch, especially when you start developing variations like the drop shot masterclass: developing touch and feel for winners from anywhere.
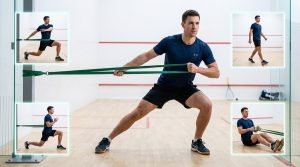
Step Two: Building a Stable Athletic Stance
Footwork determines whether you can execute proper technique. Arrive at the ball with your body positioned correctly, and the stroke almost hits itself. Arrive off-balance, and even perfect mechanics won’t save you.
For a forehand drive, your feet should form a stable base:
- Left foot (for right-handers) points towards the front wall
- Right foot sits roughly perpendicular, creating an open stance
- Weight starts on your back foot during preparation
- Knees bend slightly, lowering your centre of gravity
- Shoulders rotate back, coiling your upper body
The distance between your feet matters. Too narrow, and you lack stability. Too wide, and you can’t transfer weight efficiently. Aim for roughly shoulder-width apart.
Your body should feel like a spring being compressed. The rotation and weight shift create stored energy that releases through the shot. Professional players make this look subtle, but watch their shoulders and hips. The rotation might only be 45 degrees, but it makes all the difference.
Step Three: Mastering the Backswing Path
The backswing prepares everything that follows. Get it wrong here, and you’ll compensate with poor mechanics later.
Start with your racket up. Many players let it drop below waist height, then have to lift it back up to strike the ball. This creates a looping motion that wastes time and energy. Instead, take your racket back at roughly shoulder height.
Your elbow should bend naturally, creating an L-shape with your forearm and upper arm. The racket head points towards the back wall, with the face slightly open. This position loads your arm like a catapult.
Watch your wrist. It should cock back slightly, creating an additional angle that stores power. But don’t force it into an extreme position. The wrist hinge happens naturally if you maintain a relaxed grip.
“The backswing isn’t about going as far back as possible. It’s about creating the right angles and positions so your forward swing can accelerate smoothly through the ball. Economy of movement beats excessive preparation every time.” – Professional coaching wisdom
Step Four: Timing Your Contact Point Perfectly
Contact point determines everything about your shot. Hit the ball too far forward, and it goes cross-court. Too far back, and you push it weakly down the wall. Too high, and you lose power. Too low, and you risk the tin.
The ideal contact point sits just in front of your leading hip. At this position, your body weight transfers forward naturally, and your arm extends fully without overreaching.
Height matters just as much as horizontal position. For a standard drive, contact the ball between knee and hip height. This allows a slightly downward strike that generates pace whilst keeping the ball low on the front wall.
Your racket face angle at contact determines trajectory. A square face sends the ball straight. Opening the face slightly (5-10 degrees) adds a touch of slice that makes the ball die in the back corner. This subtle variation, similar to what you see when watching why Paul Coll’s unorthodox style is redefining power play in professional squash, separates good drives from great ones.
The strike itself should feel crisp. You’re not pushing the ball or guiding it. You’re hitting through it with conviction. The contact time lasts milliseconds, but that brief moment determines whether your shot has penetration or sits up tamely.
Step Five: Following Through With Purpose
Many players think the shot ends at contact. It doesn’t.
Your follow-through reveals everything about your swing path and determines your recovery position. A proper follow-through continues naturally from your swing, with the racket finishing high and across your body.
Here’s what should happen:
- Your racket continues forward and upward after contact
- Your body weight completes its transfer onto your front foot
- Your hips and shoulders rotate through towards the front wall
- The racket finishes near your opposite shoulder
- Your back foot pivots naturally, preparing you to push back to the T
The follow-through shouldn’t feel forced. If you accelerate smoothly through contact, momentum carries your racket through naturally. Fighting this momentum or cutting your swing short creates tension and reduces power.
Your eyes should track the ball all the way to the front wall, then immediately shift to watching your opponent’s position. This awareness helps you read their next move and position yourself optimally.
Common Mistakes That Sabotage Your Forehand
Understanding what not to do often helps as much as knowing correct technique. These errors appear constantly at club level.
| Mistake | Why It Happens | How It Hurts Your Game | The Fix |
|---|---|---|---|
| Dropping the racket head | Trying to scoop the ball | Creates upward trajectory, ball sits up | Keep racket head above wrist through contact |
| Hitting off the back foot | Poor footwork, arriving late | Weak shot with no penetration | Transfer weight forward during strike |
| Wrapping the follow-through | Trying to force cross-court angle | Inconsistent direction, reduced power | Let racket finish naturally across body |
| Watching your shot | Admiring your work | Poor court positioning, slow recovery | Eyes to ball, then immediately to opponent |
| Gripping too tightly | Tension from trying too hard | Reduced racket head speed, arm fatigue | Firm but relaxed, tighten only at contact |
The wrapping mistake deserves special attention. When players try to force the ball cross-court, they often wrap their follow-through around their body rather than finishing high. This creates sidespin that makes the ball bounce unpredictably and reduces your ability to hit a tight length.
Building Power Through Proper Mechanics
Power comes from sequential energy transfer, not muscular effort. Think of a whip cracking. The handle moves first, then each section accelerates in sequence until the tip moves fastest of all.
Your forehand works the same way:
- Legs push off the ground, initiating movement
- Hips rotate, transferring energy upward
- Shoulders turn, accelerating the upper body
- Arm extends, bringing the racket forward
- Wrist releases, creating final acceleration
Each segment adds speed to the next. Miss one link in the chain, and you lose significant power. This explains why some smaller players hit harder than larger opponents. They use their entire body efficiently rather than relying on arm strength alone.
The kinetic chain also explains why timing matters so much. If your hips rotate too early or too late relative to your arm swing, the energy transfer breaks down. Everything must sequence perfectly for maximum effect.
String tension affects how power translates into ball speed, as explored in the truth about squash string tension and how it transforms your game. But technique always matters more than equipment. Master the mechanics first, then fine-tune your setup.
Developing Consistency Through Repetition
Knowing the technique intellectually differs from executing it instinctively under pressure. You need to groove the pattern through repetition until it becomes automatic.
Start with shadow swings. Stand in position and execute the complete motion without a ball. Focus on one element at a time. Spend five minutes just on your backswing path. Then five minutes on weight transfer. Then five minutes on follow-through.
This isolated practice builds muscle memory faster than hitting hundreds of balls with poor technique. Your body learns the correct pattern without the distraction of actually striking anything.
Once the motion feels natural, add the ball. Start with simple feeds. Have someone drop balls at the perfect height and distance. Remove all variables except your swing. Hit twenty drives focusing purely on contact point. Then twenty focusing purely on follow-through.
Progress to feeding yourself with a short bounce off the side wall. This adds the element of timing whilst keeping the setup relatively simple. Only after you can hit ten consecutive good drives from self-feeds should you move to full rally practice.
Adapting Your Drive for Different Situations
The basic technique stays consistent, but small adjustments let you handle various scenarios. A ball dying in the back corner requires different preparation than one sitting up mid-court.
For low balls, bend your knees more and get your body lower. Don’t just reach down with your arm. The whole body drops, maintaining the same swing path relative to your torso. This prevents the common error of scooping, which sends the ball upwards into the middle of the court.
For high balls, adjust your contact point forward slightly and open your racket face a touch more. The higher bounce gives you more time, so use it to set up perfectly rather than rushing.
When stretched wide, shorten your backswing. You don’t have time for full preparation, so focus on clean contact and getting the ball back deep. Accuracy matters more than power when you’re out of position.
Against pace, reduce your own swing length. The ball already carries energy. You just need to redirect it. Let the opponent’s power work for you rather than trying to add more. This principle applies to other shots too, like when learning why your backhand volley keeps hitting the tin and how to fix it.
Putting It All Together on Court
Individual components mean nothing if you can’t combine them during actual play. The transition from drills to matches requires deliberate practice.
Start each session with ten minutes of pure technique work. Hit drives with no pressure, no score, no opponent. Just you and the ball, focusing on execution. This primes your muscle memory before the chaos of competition begins.
During practice games, pick one technical element to emphasise. Maybe this week you focus exclusively on contact point. Next week, you emphasise follow-through. This targeted approach improves specific weaknesses whilst maintaining overall play.
Film yourself if possible. Video reveals truths your body sense misses. You might think you’re transferring weight forward, but the camera shows you leaning back. You might feel your follow-through finishes high, but it actually cuts off at shoulder height. Visual feedback accelerates improvement dramatically.
Play cooperative rallies where both players hit only straight drives. No winners, no pressure, just grooving the pattern. Twenty consecutive exchanges builds confidence and consistency. Your body learns that executing proper technique produces reliable results.
Making Your Forehand Drive a Weapon
Technical mastery transforms your forehand from a neutral shot into an attacking weapon. Once you can execute the mechanics reliably, you start adding variations that keep opponents guessing.
Vary your pace without changing your preparation. The same backswing can produce a penetrating drive or a slower, higher shot that pushes your opponent deep. This deception comes from adjusting racket head speed at the last moment, not from telegraphing with different preparations.
Mix in occasional holds. Take your normal backswing, pause fractionally, then strike. This tiny delay disrupts your opponent’s timing and creates openings. But use it sparingly. Overuse makes it predictable.
Change your target on the front wall. A drive hit three feet high dies in the back corner. The same technique targeting five feet high bounces deeper, pinning your opponent behind you. One foot lower, and the ball comes off the back wall, creating a potential attacking opportunity.
These variations only work if your basic technique stays consistent. Opponents can’t read what you’ll do if every preparation looks identical. But if you change your swing for different shots, you give away your intentions.
Your Forehand Journey Starts Now
The squash forehand drive technique isn’t complicated, but it requires patience and attention to detail. Most players try to fix everything at once and end up improving nothing. Instead, work through the five steps systematically.
Spend a week on grip and stance. Then a week on backswing mechanics. Then contact point, then follow-through. Build the foundation properly, and everything else falls into place naturally. Rush the process, and you’ll struggle with inconsistency for years.
Remember that every professional player you admire went through this same learning process. Their effortless-looking drives result from thousands of hours grooving these exact mechanics. The difference between you and them isn’t talent. It’s repetition and commitment to proper technique.
Start your next practice session with shadow swings. Five minutes of perfect repetitions without a ball. Then progress to simple feeds, focusing on one technical element at a time. Before long, your forehand drive will feel smooth, powerful, and reliable. That’s when squash becomes truly enjoyable.