Stop Guessing Your Racquet Angle: The Simple Geometry Behind Consistent Squash Shots
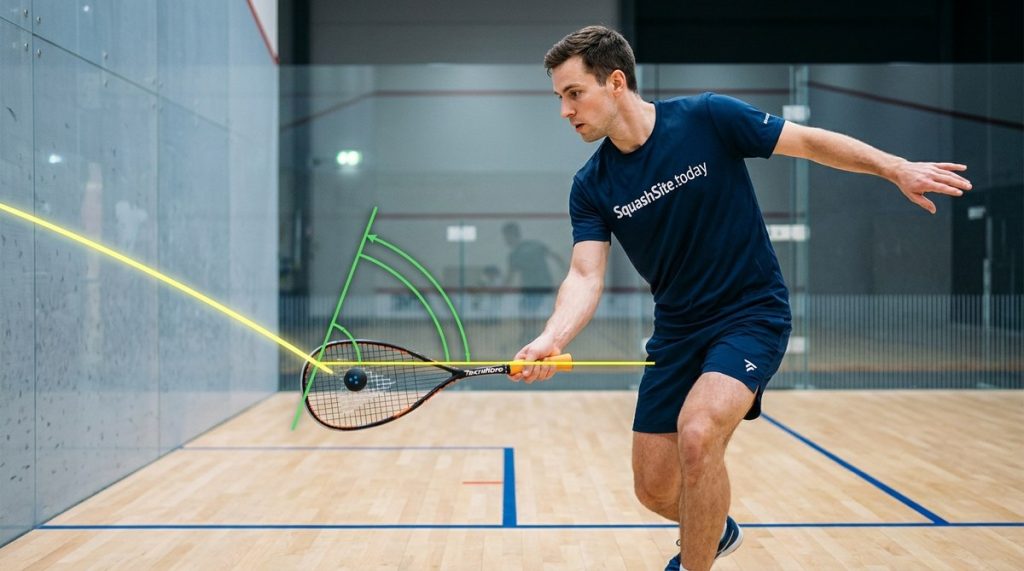
You are standing at the back of the court, ready to return a cross-court drive. Your feet are set. Your swing feels smooth. But the ball flies wide, clipping the side wall when you aimed for the corner. You adjust your wrist slightly on the next rally, and the shot sails too high. Sound familiar? The problem is not your power or your timing. It is your racket angle. Most club players treat racket face control as a feeling, something you adjust by trial and error. But there is a better way. By understanding the simple geometry of your racket face, you can remove the guesswork and build repeatable, consistent shots.
Your squash racket angle is not a mystery you have to solve by feel. It is a geometric relationship between your swing path, your wrist position, and the target line. By learning three reference angles and a simple check routine, you can diagnose why your shots miss and fix them in minutes. This article gives you the framework to stop guessing.
Why Your Shots Keep Missing the Target
When a shot goes wrong, the natural reaction is to blame your swing speed or your footwork. But the real culprit is often the orientation of your racket face at the moment of impact. The racket face is the flat surface of the strings. If that surface is not square to your intended target line, the ball will deflect at an angle.
Think of it like bouncing a ball off a wall. If you throw it straight at the wall, it comes straight back. If you throw it at an angle, it bounces away at the opposite angle. Your racket works the same way. The difference is that you are moving the wall, and the ball is coming at you from different directions.
There are three common reasons why your racket face angle goes wrong:
- You open the face too early during your backswing, and your wrist never returns to neutral.
- You close the face (turn it downward) too aggressively through impact, sending the ball into the floor.
- You swing across your body instead of along the intended line, which twists the face at the last millisecond.
Each of these faults has a geometric fix. You just need to know where to look.
The Three Reference Angles You Need to Know
To control your racket face, you need to be aware of three angles. They work together, but you can isolate each one during practice.
1. The Wrist Hinge Angle
This is the angle between your forearm and the racket shaft. When your wrist is neutral, the racket shaft forms a straight line with your forearm. If you cock your wrist back (extension), the racket face opens upward. If you bend it forward (flexion), the racket face points downward.
Most inconsistent shots come from a wrist that changes angle during the swing. A stable wrist hinge angle throughout the hitting zone gives you a predictable racket face.
2. The Swing Plane Angle
This is the angle of your swing relative to the ground. A flat swing (parallel to the floor) sends the ball straight. A steep swing (chopping down) adds downward angle. A rising swing lifts the ball.
Your swing plane should match the height of the incoming ball. Low balls need a flatter swing. High balls need a slightly steeper cut. If you use the same swing plane for every shot, your racket angle will be wrong for half of them.
3. The Face Angle Relative to Target
This is the angle between the racket face and the line you want the ball to travel. At impact, the racket face should be perpendicular to your target line. If you want the ball to go straight down the side wall, the face must be square to that wall. If you want to cross-court, the face must be angled accordingly.
This sounds obvious, but many players aim with their body instead of their racket face. They turn their shoulders to the target but keep the racket face pointing somewhere else.
A Simple Drill to Find Your Neutral Racket Face
Before you can adjust your angle, you need to know what neutral feels like. Here is a drill you can do at home without a ball.
- Hold your racket in your normal grip. Stand in your ready position.
- Close your eyes and bring the racket to the point where you would make contact with a ball.
- Open your eyes and look at the racket face. Is it tilted up, down, or square to the floor?
- Adjust your wrist until the face is perfectly vertical. That is your neutral position.
- Repeat this ten times. Your goal is to find neutral without looking.
Once you can find neutral consistently, you have a baseline. Every shot starts from this position. If you deviate, you know exactly how much.
Common Racket Angle Mistakes and Their Fixes
| Mistake | What Happens | Geometric Fix |
|---|---|---|
| Open face (wrist cocked back) | Ball lifts high, loses pace | Keep wrist neutral through the hitting zone. Think of pushing the racket face through the ball. |
| Closed face (wrist bent forward) | Ball dives into the floor | Relax your grip. A tense wrist tends to close the face. Let the racket sit naturally in your hand. |
| Late wrist rotation | Ball goes wide to the right or left | Start your wrist turn earlier. The face should be set before you enter the hitting zone, not during it. |
| Over-rotation | Ball hooks too much | Reduce the wrist turn by 10 percent. Let the swing path do the work. |
| No rotation on cross-court shots | Ball goes straight instead of across | Add a controlled wrist rotation to open the face toward the target. |
How to Adjust Your Racket Angle for Different Shots
Different situations call for different racket face settings. Here is how to adapt.
Forehand drives along the side wall
Keep your wrist neutral. Your swing plane should be flat to slightly rising. The racket face stays square to the side wall. This gives you a clean, straight drive that hugs the line.
Backhand volleys from the back court
Your wrist will naturally want to open here. Resist it. Keep the face slightly closed (pointing downward) to stop the ball from lifting. Aim for a swing plane that cuts across your body, not away from it.
Cross-court drives
This is where most players struggle. You need to rotate your wrist to open the racket face toward the opposite side wall. The amount of rotation depends on how far across the court you want to send the ball. A 15-degree rotation sends it to the middle. A 30-degree rotation sends it to the far wall.
“The best players do not think about their racket angle during a match. They have trained it so often that their wrist knows exactly where to be. But they did not get there by guessing. They got there by drilling the geometry until it became automatic.” – Coach Mark Thompson, former PSA tour coach
A 3-Step Process to Diagnose Your Angle Problems
If your shots are inconsistent, use this process to find the fault.
- Isolate the variable. Hit ten forehand drives with no opponent. Watch where the ball goes. If it is consistent but wrong, your swing plane or wrist angle is off. If it is random, your wrist is moving during the swing.
- Check your grip. A grip that is too tight restricts wrist movement. A grip that is too loose lets the racket flop. Your grip should be firm enough to control the face but relaxed enough to allow natural wrist motion. If you are unsure about your grip, read our guide on why your squash racket grip size actually matters more than you think.
- Film yourself. Set up a phone at the side of the court. Record five swings in slow motion. Pause at the moment of impact. Look at the racket face. Is it square to your target? If not, you have your answer.
Building Muscle Memory for Consistent Racket Face Control
Knowing the geometry is one thing. Making it automatic is another. Here are three ways to train your racket angle without thinking about it.
Wall practice
Stand about a metre from a wall. Hold your racket in your ready position. Slowly swing and stop at the point of impact. The racket face should be parallel to the wall. Do this fifty times on each side. Your brain will learn the position.
Shadow swings with a mirror
Use a full-length mirror. Swing slowly and watch the racket face. Adjust until it looks square. Then close your eyes and try to reproduce the same feeling. Check the mirror. Repeat until you can find square without looking.
Slow-motion hitting
Hit balls at 50 percent speed. Focus entirely on the racket face at impact. Do not worry about power. Do this for ten minutes at the start of every practice session. Speed will come later.
For more ideas on training without a partner, check out our list of solo court drills: 12 exercises you can do without a partner.
Why Equipment Can Affect Your Racket Angle
Your racket itself plays a role in how easy it is to control the face. A head-heavy racket tends to drop the face through the hitting zone, especially if your wrist is tired. A lighter, more balanced frame gives you more control over the angle.
If you are using a racket that feels sluggish through the swing, you might be fighting the equipment rather than your technique. Our guide on lightweight vs head-heavy rackets: which frame balance suits your playing style can help you choose the right balance.
String tension also matters. Loose strings can shift at impact, changing the effective angle of the racket face. If your strings are old or uneven, replace them. Learn more in our article about how often should you really be restringing your squash racket.
Putting the Geometry Into Practice
Stop guessing your racket angle. Start using the geometry. The next time you step on court, run through the three reference angles before you hit a single ball. Check your wrist hinge. Set your swing plane. Square your face to the target. Hit ten shots and see how many land where you intended.
If you miss, do not adjust randomly. Use the 3-step diagnosis process. Find the fault. Fix it with purpose. Over time, your brain will learn the correct positions, and your shots will become more consistent without conscious effort.
Your New Routine for Racket Face Control
Here is a summary of what to do every time you practice.
- Spend five minutes on wall practice to reset your neutral wrist position.
- Hit twenty slow forehand drives, checking the racket face at impact.
- Hit twenty slow backhand volleys, keeping the face closed.
- Hit twenty cross-court drives, focusing on the wrist rotation.
- Record one set of swings and review the footage.
This routine takes about fifteen minutes. Do it for two weeks, and you will notice a difference in your shot accuracy. Your drives will stay on line. Your volleys will stop hitting the tin. Your cross-court shots will land where you aim.
The Geometry Never Lies
Your racket angle is not a mystery. It is a simple relationship between your wrist, your swing, and your target. When you understand the geometry, you stop relying on feel and start building repeatable technique. The next time a shot goes wrong, you will know exactly why and how to fix it.
If you want to take your consistency further, combine this racket face work with better movement. Our guide on the 20-minute court session that transforms your movement speed pairs perfectly with these angle drills. Better footwork means you arrive at the ball in a better position, which makes controlling your racket angle much easier.
Start with the geometry. Trust the numbers. Your squash game will thank you.